You’ve got your beautiful bone choker necklace, but there’s one frustrating problem: it keeps coming untied. Whether you’re wearing it to a festival, out on the town, or just as part of your everyday style, the last thing you want is to constantly retie your choker throughout the day.
The good news? There’s a simple solution that will keep your bone choker secure all day long. It’s called the surgeon’s knot, and once you learn this technique, you’ll never worry about your choker coming loose again.
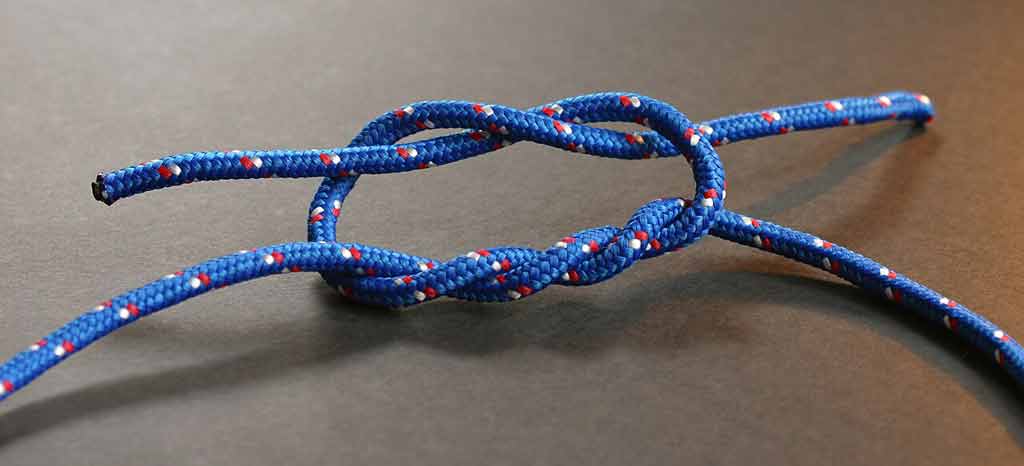
Attribution: CC BY-SA 3.0, https://commons.wikimedia.org/w/index.php?curid=258693
That’s the knot right there, really. You don’t have to keep reading, but you can if you want to 🙂
Source: wikipedia
Why Regular Knots Fail on Bone Chokers
Most people tie their bone choker necklaces with a simple overhand knot or square knot. While these work temporarily, they have a major weakness: they slip on smooth cord material.
Bone chokers typically use waxed cotton cord, leather cord, or synthetic string. These materials are designed to be comfortable against your skin, but that same smoothness makes standard knots unreliable. Add in normal movement throughout your day, and those knots gradually loosen until your choker falls off or hangs awkwardly.
What Makes the Surgeon’s Knot Different
The surgeon’s knot is a modified square knot that adds an extra wrap on the first throw. This creates significantly more friction, which prevents the knot from slipping. Surgeons use this knot when tying sutures because it needs to hold tight under tension, and it works just as well for your bone choker.
The key advantages of the surgeon’s knot for bone chokers:
Superior grip: The extra wrap creates friction that prevents slipping
Easy to tie: Only slightly more complex than a regular knot
Easy to untie: Unlike some security knots, you can still remove your choker without cutting the cord
Adjustable: You can slide the knot to adjust fit before fully tightening
Low profile: Sits flat against your neck without bulky loops
Step-by-Step: How to Tie the Surgeon’s Knot
Follow these simple steps to secure your bone choker with a surgeon’s knot:
Step 1: Position Your Choker
Put your bone choker around your neck at the desired tightness. Hold one cord end in each hand behind your neck. Make sure the choker sits comfortably, not too tight or too loose.
Step 2: Cross the Cords
Cross the right cord over the left cord, creating an “X” shape. This is the same starting position as tying your shoes.
Step 3: Make the First Throw (Double Wrap)
Here’s where the surgeon’s knot differs from a regular knot. Take the cord that’s now on top and wrap it around the other cord twice instead of once. Thread it through the loop you’ve created and pull both ends to tighten this first throw moderately.
Important: Don’t pull too tight yet. You want this first throw snug but not fully tightened, as you’ll add a second throw.
Step 4: Make the Second Throw
Now tie a standard second throw to complete the knot. Cross the cords again (the cord that was on the left should now go over the right), wrap it around once, and thread it through the loop.
Step 5: Tighten and Test
Pull both cord ends firmly to tighten the complete knot. The double wrap on the first throw will grip and prevent slipping. Give your choker a gentle tug to test the security. The knot should hold firm without any give.
Step 6: Trim Excess Cord (Optional)
If your cord ends are too long, you can trim them to about half an inch from the knot. Be careful not to cut too close, as you need enough cord to untie the knot later. You can also leave the ends long for a decorative look.
Pro Tips for Maximum Security
Want to make absolutely sure your bone choker stays put? Try these additional tips:
Wet the cord slightly: Dampening the cord before tying increases friction and helps the knot set more securely. Let it dry while wearing it.
Pull evenly: When tightening, pull both cord ends with equal force to prevent the knot from becoming lopsided.
Check your work: After tying, examine the knot to ensure both throws are properly formed and tightened.
Break in new cord: Brand new cord can be stiff. Wearing your choker a few times helps the cord become more pliable and easier to knot securely.
Avoid oils and lotions: Apply perfumes, sunscreens, and lotions before putting on your choker. These products can make the cord slippery.
How to Untie the Surgeon’s Knot
When you’re ready to remove your bone choker, the surgeon’s knot is still easy to untie despite its security:
Locate the second throw of the knot (the single wrap)
Push the cord ends toward each other to create slack in this throw
Work the second throw loose by pulling one cord end
Once the second throw is undone, the first throw (double wrap) will loosen easily
Pull the cords apart to fully release the knot
Troubleshooting Common Issues
My knot still slips
If your surgeon’s knot is still slipping, double-check that you made the double wrap on the first throw. A single wrap on both throws is just a square knot and won’t provide the same security. Also ensure you’re pulling both throws tight.
The knot is too bulky
A properly tied surgeon’s knot should be only slightly larger than a regular knot. If it feels bulky, you may be wrapping too many times. Remember: double wrap on the first throw, single wrap on the second throw.
I can’t get the choker tight enough
If your choker cord is too long, you may have excess material that prevents a snug fit. Consider trimming the cord or tying the knot in a different position along the cord length to achieve your desired fit.
The cord is too slippery
Some synthetic cords are extremely smooth. If you’re still having trouble, try adding a tiny drop of fabric glue or clear nail polish to the knot after tying (let your choker dry completely before wearing). This is a permanent solution, so only do this if you’re sure of your fit.
Caring for Your Bone Choker Cord
Proper cord maintenance helps your surgeon’s knot work even better:
Keep it clean: Wipe down the cord occasionally with a slightly damp cloth to remove oils and dirt
Avoid excessive moisture: While a little dampness helps with knot-tying, prolonged exposure to water can weaken the cord
Store properly: When not wearing your choker, store it flat or loosely coiled to prevent kinks in the cord
Why This Matters for Your Bone Choker Experience
Your bone choker necklace is more than just an accessory. It’s a connection to Southwestern heritage and Native American artistry, a statement piece that reflects your appreciation for authentic craftsmanship and cultural tradition.
When your choker keeps coming untied, it’s not just annoying—it diminishes your experience and prevents you from fully enjoying this meaningful piece of jewelry. The surgeon’s knot solves this problem simply and effectively, letting you wear your bone choker with confidence whether you’re at a concert, a powwow, exploring the outdoors, or just going about your daily life.
Master the Knot, Enjoy Your Choker
Learning the surgeon’s knot takes just a few minutes, but it will transform how you wear your bone choker necklace. No more constant adjustments, no more worrying about it falling off at the worst possible moment, and no more frustration with loose knots.
The next time you put on your bone choker, take an extra thirty seconds to tie it with a surgeon’s knot. That small investment of time will give you all-day security and peace of mind. Your bone choker will stay exactly where you want it, letting you focus on what really matters: expressing your unique style and connection to the rich cultural heritage these beautiful pieces represent.
Now get out there and wear your bone choker with confidence!